I’m interrupting my food-coma-induced silence to bring you the DIY that has lately revolutionized my life: sharpening my own clipper blades! It’s a good break project too, so somewhat timely.
I’m not sure about you guys, but I find getting my clipper blades sharpened surprisingly challenging. I’ve paid to have it done at a two different places, and found myself dissatisfied with the results both times. And you have to drop them off and pick them up and wait, or wait for them to get shipped back out to you. That’s an extra level of planning I’m just not usually prepared for. Additionally, the really good sharpening guy who is local to my area doesn’t open on weekends, so you have to find a way to get to him during the week between 8 and 5, which doesn’t work with my schedule.
So when I found out that you could sharpen your own blades quickly and easily with just one thing that I already had at home, I was sold. That one thing? A whetstone.
https://www.instagram.com/p/Bc5-Y3iFPr3/?taken-by=nicolegizelle
I’m no sharpening expert, but I watched a bunch of youtube videos that all had the same basic consensus on the method, which seemed pretty easy. My father in law also pointed out that he’s never sharpened something and made it worse. Plus, I clipped my friend’s mare after doing a test-sharpen on my blades and found it pretty easy, even on her tight, thick hair. So that makes me a bona fide internet expert (clip job shown above).
So here’s how you do it.
Supplies
- a whetstone (I use this one)
- a towel you don’t mind staining forever
- paper towels
- a bowl of water
- clipper blades
- phillips head screwdriver
- clipper blade oil
 I did not suggest an adult beverage because we are working with sharp objects, but you’re an adult, you can make your own choices
First, soak or otherwise prepare your whetstone. The twinternet says 5-40 minutes. I soaked mine for about ten.
 make sure it’s covered in water
Then you have the slightly fiddly task of taking your clipper blades apart. You simply need to loosen the two screws on the bottom of the clipper blades with your screwdriver. Don’t try to use a butter knife, it won’t work. I tried.
Use your rag towel to provide a surface to keep all your pieces together, and to stabilize your whetstone when you start sharpening.

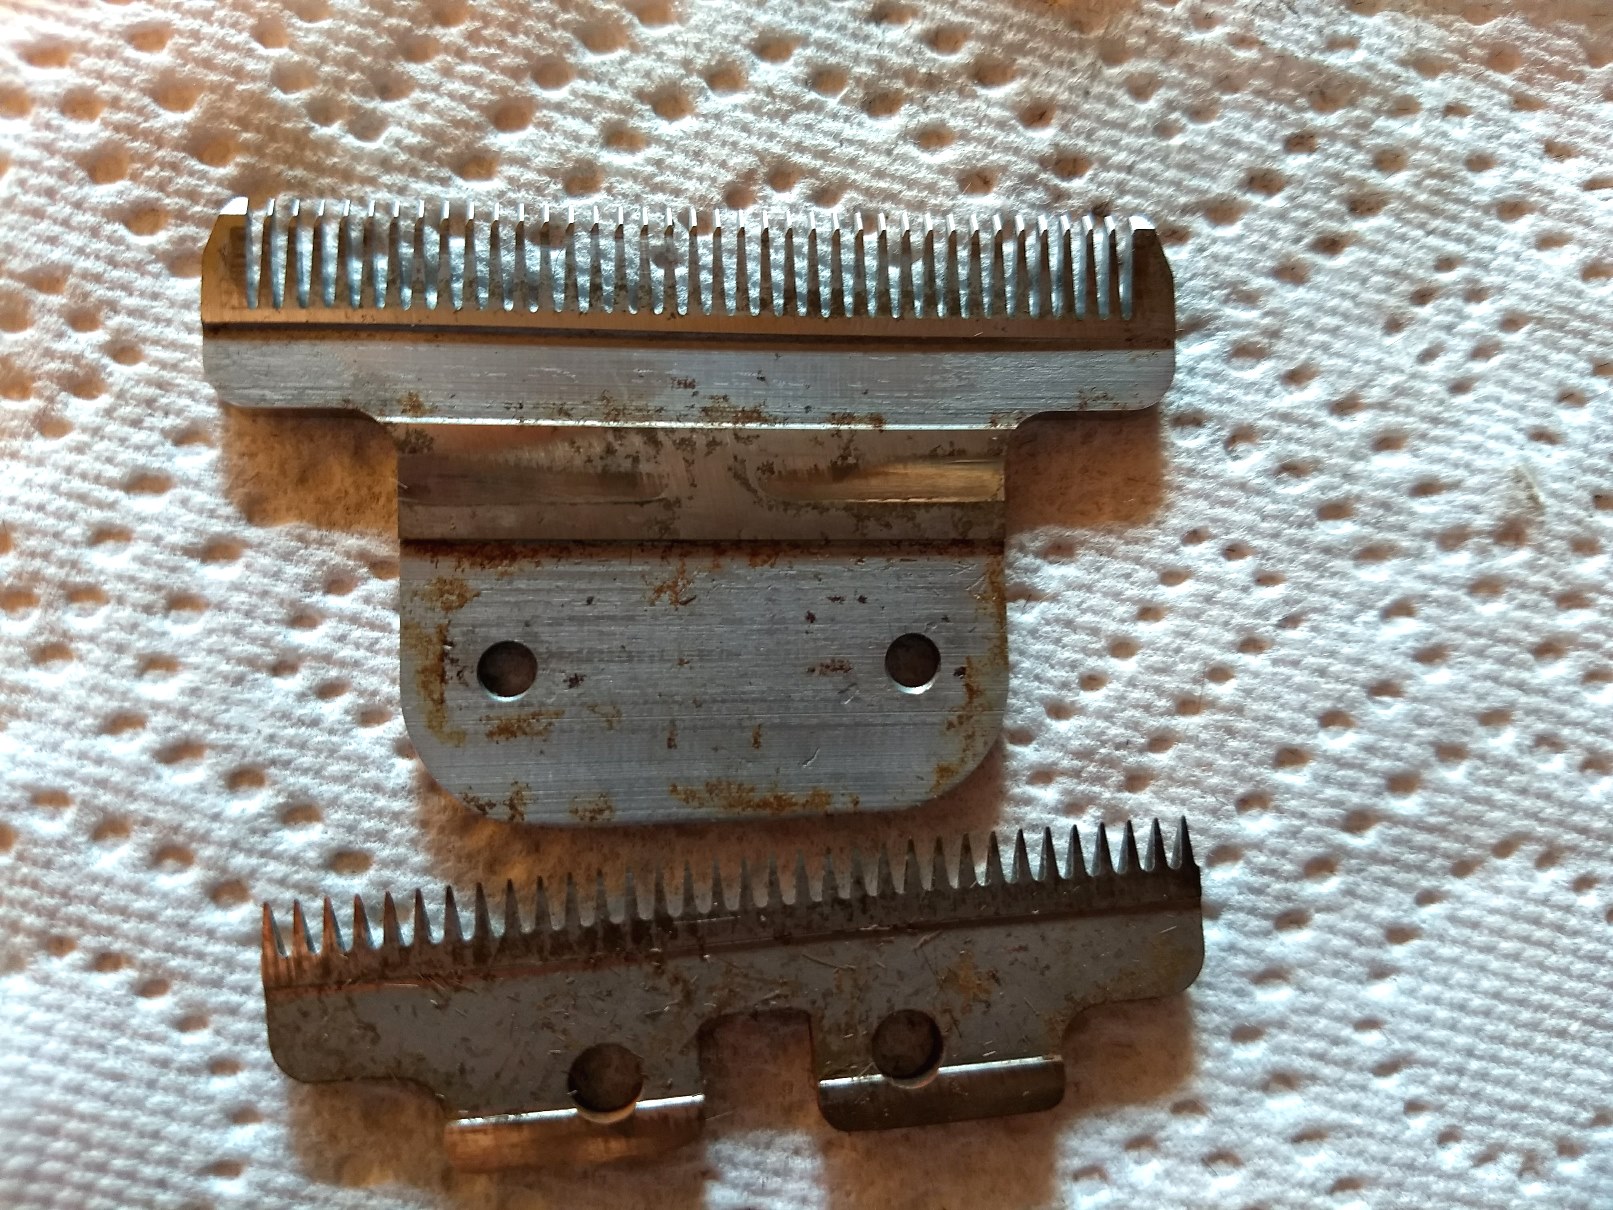
There are only four pieces (plus two screws) that you have to keep track of, so it’s not too horrifying to take apart. Try to keep the top two pieces together so that you don’t have to fiddle around with them later. Step by step take-apart image below.

Brush all of the hair and dirt and grit out of your blades with a small brush (often comes with clippers), or if you lost it like me, a paper towel.
I tried to take some pictures of how dirty/rusty my blades were, but it was not the easiest picture ever. But you can see dirt and rust on the interior of the blades (this is my wide T84 blade, but it comes apart just the same as the other blades).
Next, plop some water on your sharpening stone and get ready to get dirty! I started on the coarse (1000 grit) side of the stone, and moved to the fine side (4000 grit I think, but maybe 6000) to polish/finish it off. For the blades that had only done a trace clip on one horse since they were last sharpened, I only used the fine grit side (which is why my animations are a bit different from the pictures here).

You should be able to tell the grit level of your stone by feeling it — there’s a big difference between 1000 and 4000 grit.

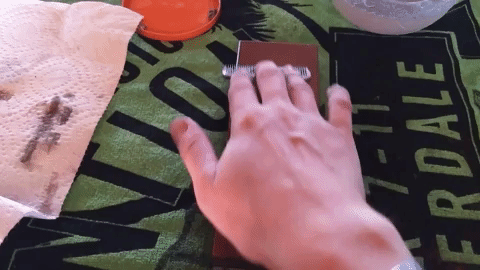
You are going to sharpen to the two flat sides of the toothed blade; the sides that sit facing one another when the clippers are put together. Once the blade is on the stone with water, you just start rubbing it along the stone with firm and even pressure.

You’ll start seeing dirty/gritty water appear on the stone, and that’s good! That grit is what helps clean up your blade.
Keep adding water to your stone and blade as you go, you want it to stay wet (not underwater, but not just damp) the whole time.

I use three motions to sharpen my blade. First, moving the blade straight up and down square to the stone.
I also run just the edge of the blade across the edge of the stone. This one is a bit more challenging as you have to avoid biting into the edge of your stone with the underside of the blade, and have to try to keep things flat.

Finally, I make circles with the blade along the stone.

From what I understand, using these different motions allows you to avoid making waves/divots in your stone, but also helps you sharpen different parts of the blade. But what do I know.
Keep even pressure across the blade to sharpen the whole length as evenly as possible.

Check the blades regularly to see how clean they are getting. Because you can’t test sharpness until they are put back together, I use cleanness to indicate sharpness. So when I can still see bits of dirt and rust I keep going. When the blades look really shiny and reflective, I know I’m close to done.

Here’s one blade in sunlight. It’s hard to see, but the central teeth are still dirty, so I kept going. Shortly after this, I switched to the fine grit so I could get them really polished (and hopefully sharp).
Just keep rubbing in different directions and orientations and you’ll get there.


When the blades were super shiny and reflective, I called it good. You can see in the pictures that the blades are quite shiny across the entiren length, though in person the middle section was a touch less shiny. I also did this process on the white “ceramic” blade that came on one set of clippers, and they seemed to respond much like the metal blades.
After sharpening, you want to dry the blades off really well. I put the pieces in front of the fireplace for 20 minutes or so, but a low oven would do too. Or in the sunlight if it weren’t too humid.

The last part is the most fiddly – putting the blades back together. It’s just the reverse of taking them apart, but more irritating. Place the small blade on top of the large one with the cutting surfaces touching and line the teeth up. Then place the top pieces down in line with the holes for the screws. The bar on the top pieces fits in a groove on the top blade, which is how the top blade stays in place. Then you need to line the screws up and tighten them down.
I found that by loosely winding one screw in, I could re-adjust the other half of the blade to get the second screw lightly placed. During this step you should make sure your clipper blades are lined up straight, otherwise you’ll end up with a really uneven clip (I imagine, haven’t tested this). Once everything is lined up, really tighten the screws down.
I dried the blades off again on the fireplace after putting them together, then tightened one more time. Now it is time to apply clipper oil. This will prevent your blades from rusting and keep them clean for your next clip job. Attach your blades to your clipper, apply a line of oil across the teeth, then turn the clippers on and let them run for a moment.
Soak your whetstone to get off any residual metal fillings. If you have one, use a flattening stone to resurface the whetstone and achieve a really flat surface again (if you think it needs it). I store my stone in the box it came in, after I’ve cleaned and let it air dry.
And voila! Clippers sharpened. Three sets of clippers took me two episodes of Agents of S.H.I.E.L.D., all the way through clean up. Well worth the time and investment, imo!

Innnnnnteresting. My husband uses these exact items and this exact process to do our kitchen knives, but I never thought about doing it for clipper blades. I’d say I’ll give that a try, but I will probably continue being a lucky person and walking mine 6 blocks to the farmer’s market in June and plunking over $6 for someone to do it for me, lol. Thanks for sharing though, very cool!
LikeLike
I did two kitchen knives too and am really happy with the results!! Getting all self sufficient up in here.
LikeLike
This is beautiful. My clippers need sharpening and I never considered I could do it myself. Thank you!
LikeLiked by 1 person
How did we ever learn how to do anything before you tube?
LikeLike
That is an awfully good question. I’m not sure I want to know.
LikeLiked by 1 person
THANK YOU for this. Replacement blades for my clippers are a shot in the dark and I’ve wanted nothing more than to sharpen the original blade but the logistics of sending it off to have it done gave me a headache. I’m absolutely going to pursue this in the near future.
LikeLiked by 1 person
I’m definitely going to try this! My bf bought a whetstone after he took a knife-making class at a local forge… I”m sure he wouldn’t mind if I put my dirty horse clippers on it… hahaha!
LikeLike
Just scrape the dirty bits off with the flattening stone!!!
LikeLike
I’ve been waiting for this write up! The guy I use for sharpening is quick and cheap, but Hubby really wants a whetstone for his knives he makes, and Hubby is free. Definitely adding this to my list to try out.
LikeLike
Yeah, if NOTHING else, not having to wait or drive to get mine sharpened is a huge plus. Now tell me more about these knives your hubby makes…
LikeLike
So excited to try this! I am actually most frightened of trying to put the clippers back together…. Thanks for all the great pics!
LikeLike
I can’t find a good sharpening place that isn’t expensive so I literally just buy new blades every time I need to sharpen mine. I definitely need to try this.
LikeLike
You’ll have so many sharp blades now!!!
LikeLike
Awesome DIY!
LikeLike
Really neat DIY! I have a friend who clips a lot – I’ll have to share this with her.
LikeLike
Very interesting. I’ll have to consider getting a whole whetstone and stuff if I actually start clipping anywhere close to regularly.
LikeLike
This is so cool!! DEFINITELY 100% WILL TRY!
LikeLike
THANK YOU!!! Since moving to CA, I am faced with the same PIA drop off/pick up from a very inconvenient part of town (used to get it done cheaply at my old tack store that I was at all the time anyway). For some reason I thought sharpeners were like $250! I’ve been putting off my horse’s 2nd body clip because I really need sharpening first. Prefer to do things myself anyway, lol. Thanks!
LikeLike
Were they actually sharp? I have tried many different ways of sharpening and they always wouldn’t cut. I was told it’s because they have to be hollow ground. 🤷🏼♀️
LikeLike
Yep! Though there’s another part to sharpening that I didn’t know about when I wrote this. The blade tension also needs to be adjusted correctly after putting them back together. Very sharp blades won’t cut anything if the tension is too loose.
LikeLike
So I am a sharpener and will give you my thoughts. So you can’t sharpen ceramic blade on most stones. You need a diamond plate for those. Secondly most clipper blades are hollow ground not flat ground as those stones do. We use a special plate for hollow grounding. It creates a hollow that aids in dealing with the fur. The blades also need to be adjusted and aligned correctly or they won’t cut. Lastly spring tension needs to be 2.5 to 3 lbs….and one other thing don’t just rub the teeth on the stone. Sharpen the entire surface at once.
LikeLike
Rick, thank you so much for your thoughts! I so appreciate them. I certainly don’t think I’m getting a better sharpen than I would get from you — or other sharpeners who really know their business. (I have, unfortunately, mostly paid for my blades to come back cutting nearly as poorly as when I sent them away.) Since I posted this I’ve learned about tension adjustment, which also helped tremendously. If you have any other resources that those of us who DIY, I’d love to see them!
LikeLike